Thursday, October 31, 2013

{31 Days of Pinterest Completed} Jersey Headband

PIN INSPIRATION:

pin link / source

~
My niece Nora is a girl who likes pretty clothes and pink. For her birthday, I made her a headband like this out on hot pink jersey. (In fact, it was leftover fabric from the yo-yo shirt I made refashioned.) It was really easy to make and didn't take that long. 


Cut your strip of fabric about 2 1/2 inches wide and a little shorter than your head circumference. Overlap your ends a big and sew up with loose stitches. When you get to the end, gather the stitches as tightly as possible. Then sew (or hot glue) on your embellishment. I used an extra large yo-yo with a button center. 


* Since I forgot to take pictures of this project before sending it to the birthday girl, my sweet sister-in-law sent me these pictures for this post. Thank you, Sarah!

~ ~ ~


I'm also linking up to Schneider Peeps' Handmade Christmas.

Wednesday, October 30, 2013

{31 Days of Pinterest Completed} Paper Christmas Trees

PIN INSPIRATION:

~

These Christmas trees look so cute and didn't take too many supplies. I found an old book of Jack London stories in an antique store for a reasonable price. 

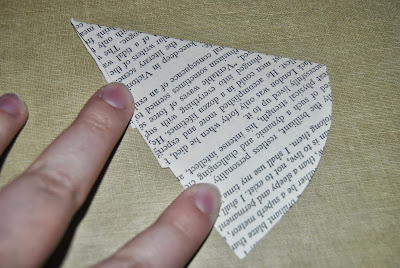
The nice thing about these trees is you can make any size you want. I used a six-inch circle for my trees. Once you cut out your circle, cut it in half.


From the left side, fold your paper over 2 inches or so. This part isn't very exact. If you fold over less, the bottom "branches" will be larger and vice versa. 


Now take the corner that was folded over and fold back so that the cut edge is even with the folded edge. 


Turn over the paper.


Take the cut edge and fold it down to meet the folded edge.


It will look like this.


Turn it back over and you will see your Christmas tree.


To make the paper lay flat, use a glue stick to adhere the folds together.


And you're all done! If you like, you can take a small strip of paper and glue on for a tree trunk as seen below.


If you need more help in understanding the directions, watch the video I've put together for you.

~CLICK HERE FOR THE VIDEO TUTORIAL~

These can be used to put on cards, put on display, or make a garland. 


~ ~ ~


I'm also linking up to Schneider Peeps' Handmade Christmas.

Tuesday, October 29, 2013

{31 Days of Pinterest Completed} Cell Phone Charging Pocket

PIN INSPIRATION:

~

This idea was so cute! It's so compact and easy to stick in a drawer when it's not being used. When a friend of ours gave a couple of boxes of fabric to my sister, who in turn gave them to me to look through, I found the perfect fabric to use for this project. It is a hydrangea print and just big enough to use for the charging pocket.

When I went to pin to look for the directions, I found that the directions were a file which was in German. After a Google search to find directions that were similar but in English. I found ~these~ directions which I used with a few adaptions such as not using a thick stabilizer (just some cotton batting). I am happy with my end result. And my phone fits in there nicely. 


~ ~ ~


I'm also linking up to Schneider Peeps' Handmade Christmas.

Monday, October 28, 2013

Return to Me {Book Review}

source
***I received a copy of this book for free from Bethany House Publishing in exchange for my honest and unbiased review. 

 I usually don't like Biblical fiction since there is a lot of fiction involved and not as much Biblical fact. Such is not the case with Lynn Austin's Biblical fiction books. Not only does she tell a good story with rich characters, she includes the actual Word when possible. In the back is a list of all the scripture references. 

 This book is about the rebuilding of the temple after the 70-year exile in Babylon. The story focuses on Iddo and his grandson Zechariah (who later becomes a prophet of God). These men obeyed God's command to return to Jerusalem and start rebuilding the temple even though many obstacles stand in their way.

I am looking forward to reading the second book in this series when it comes out in Fall 2014.

:: :: :: :: :: ::

Looking for day 28 of my 31 days series? 
 Click ~here~ to see what Pinterest project I completed today.

{31 Days of Pinterest Completed} Coffee Bean Candle

PIN INSPIRATION:

~

I love having candles around my room. They feel so homey and welcoming. I also love my coffee so when I saw the pin for a bowl of coffee beans and a candle, I wanted to try it. I used my Kati Kati coffee blend and a short white pillar candle in a bowl from my hope chest. It makes my room smell so good! Love.


~ ~ ~


Sunday, October 27, 2013

{31 Days of Pinterest Completed} Quick and Easy Blender Salsa

PIN INSPIRATION:

~

I love salsa! As much as I like it, I had never made it until I came across this recipe. It doesn't take that long to make and the flavor is really good!


Quick and Easy Blender Salsa


 Ingredients:
  • 1 small can of green chilies
  • 1/2 small onion, roughly chopped 
  • 1 clove garlic, peeled and smashed 
  • 1/2-1 jalapeno (optional) 
  • 1 teaspoon honey 
  • 1 teaspoon salt 
  • 2 teaspoon ground cumin 
  • small to medium size handful of cilantro, washed (or 2 teaspoons dried cilantro)
  • juice of 1 lime
  • 28 oz can diced tomatoes
  • 2 fresh tomatoes (optional) *

Directions:
Put all the ingredients except the tomatoes in the base of a food processor or blender and pulse to combine for 30 seconds or so until all the ingredients are finely chopped. Add the tomatoes and pulse for 5-10 seconds or until salsa is desired consistency. Taste for seasoning and adjust to taste. Serve with chips or over tacos. 


~ ~ ~


Saturday, October 26, 2013

{31 Days of Pinterest Completed} Tissue Case

PIN INSPIRATION:

~

This project was easily done in an evening. It is also hand sewing which means that it can be done while watching tv. I decided not to use pinking shears for the edges on mine. It's small enough to put in your purse for tissues on the go. 


~ ~ ~


I'm also linking up to Schneider Peeps' Handmade Christmas.

Friday, October 25, 2013

{31 Days of Pinterest Completed} Valentine Mints

PIN INSPIRATION:

~

These mints were so cute! Mine didn't turn out quite as cute as the originals but they were still good. I made mine round since I didn't have a small heart cookie cutter. When I got out my alphabet stamps they were way too big so I got out a red edible marker. I wrote Valentine-y words and hearts on mine. 


~ ~ ~


Thursday, October 24, 2013

{31 Days of Pinterest Completed} Heart-shaped Cupcakes

PIN INSPIRATION:

~

These were adorable and they turned out so well! Instead of using marbles in the cupcake tin to make the dent, I borrowed pie weights from my grandmother. Because they were smaller than a marble, I used two. I wasn't sure if it would work. I was afraid the small space in between the two would fill with batter while baking and ruin the look. But everything went fine and they looked just like hearts when baked. 


~ ~ ~


Wednesday, October 23, 2013

{31 Days of Pinterest Completed} Personalized Water Bottle Labels

PIN INSPIRATION:

~

When Maddie had her spa day, we did all kinds of pampering things including these personalized water bottles. I used some pretty scrapbook paper, paper punches, and alphabet stickers to cover plain water bottles for the special day. They were a hit!


~ ~ ~


Tuesday, October 22, 2013

{31 Days of Pinterest Completed} DIY Blush

PIN INSPIRATION:

~

I am a thrifty person. So when I saw this idea for DIY blush I decided to give it a try. It only uses baby powder, water, and red food coloring. To make a medium pink color, the directions said to use 3-4 drops of food coloring. I found I needed to use a lot more than that to get the color I usually use. It was hard to get the right consistency but I got it eventually. The first time I tried it, the color it turned out to be when dry was way too light so I tried again and got a better color.

The homemade blush didn't go on as well as store-bought blush. It was also messy since it was more powdery. My thought is that I would rather spend a little more money and get blush that is easier to work with. 


~ ~ ~


Monday, October 21, 2013

{31 Days of Pinterest Completed} Knotty Flip Flops

PIN INSPIRATION:

~

I love to have shoes for different outfits, so I thought this would be a neat way without costing too much. I caught a sale at Old Navy for their cheap flip flops. They were pretty easy to make and didn't take that long to make. When I finished them though, I tried them on and strap was a bit too tight. When I made the knot I guess I pulled a little too much through. Next time, I'll make sure to leave a little bit more room.


~ ~ ~


I'm also linking up to Schneider Peeps' Handmade Christmas.

Sunday, October 20, 2013

{31 Days of Pinterest Completed} Marshmallow Fondant

PIN INSPIRATION:

~

I find that fondant doesn't taste too good so I thought that this would be a good replacement. When planning the baby shower cupcakes, I decided to give this fondant recipe a try to make the buttons for the top of each cupcake. 


It was a bit hard to roll out because it was sticky but using some powdered sugar made it workable. Cutting shapes also got a bit sticky but since it was really pliable, it wasn't too big of a deal to make it circular again.

I still wouldn't cover a whole cake with this (I would much rather use icing) but it was nice to use for decorating.


~ ~ ~


Saturday, October 19, 2013

{31 Days of Pinterest Completed} Button Cupcakes

PIN INSPIRATION:

~

These button cupcakes are so cute! I pinned this when I first got on Pinterest and when planning the button themed baby shower, I knew I wanted to replicate this. I had thought about using real buttons but then I had the idea to make the buttons out of fondant so that they were edible. Looking through my boards some more, I came across a pin for homemade fondant that I found a while back. (More on that tomorrow.)

I had planned mini cupcakes for the brunch/shower so instead of making minuscule buttons that were hard to work with, I made one button for each cupcake that covered most of the top of the cupcakes. 


~ ~ ~


Friday, October 18, 2013

Tea Cup and Mug Exchange

I decided to join Stephanie's tea cup and mug exchange. I chose to participate in both exchanges.


~ ~ ~

Tea Cup Exchange

Claire from Gypsy Slow Down got my name for the tea cup exchange.

This tea cup looks like it was made for me! I love birds and I'd even pinned this tea cup on Pinterest before.


Claire also included a few autumnal treats in the package: delicious pumpkin pie cookies, a box of rooibos cinnamon vanilla tea, and a pack of beverage napkins with the words "GIVE thanks" printed on them.


Thank you, Claire!

~ ~ ~

Mug Exchange

Amy from God's Grace Overflows was given my name for the mug exchange.

She sent me this pretty mug. I love how it has fall colors but yet flowers for those in-between kind of days we have around here. I drank my evening coffee in it last night.


In the package along with the mug, Amy  added a pumpkin cookie cutter and a pretty fall decoration (which has already found a place in my room).


Thank you, Amy!

 ~ ~ ~

Thank you Stephanie for hosting the tea cup and mug exchange! It's been so much fun!

:: :: :: :: ::

Looking for day 18 of my 31 days series? 
Click ~here~ to see what Pinterest project I completed today.

{31 Days of Pinterest Completed} Button Gift Embellishment

PIN INSPIRATION:

~

Buttons add so much cuteness to a package. You can layer different size buttons, use a decorative shaped button, etc. For my package, I used a large wooden button and a slightly smaller white shiny button threaded through some cord and tied with a bow. It was super easy to do and made the package look extra special.


~ ~ ~


I'm also linking up to Schneider Peeps' Handmade Christmas.

Thursday, October 17, 2013

{31 Days of Pinterest Completed} Button Glass Charm

PIN INSPIRATION:

~

Another quick DIY for the shower were these adorable glass charms. I used a neutral colored thread to attach the button charm to the glass. I threaded the thread through the button, made a knot an inch or so away from the button then tied the thread around the stem of the glass so that the knot was tight against it. This way the button stayed flat even when someone took a sip of their water.


~ ~ ~


Wednesday, October 16, 2013

{31 Days of Pinterest Completed} Button Napkin Ring

PIN INSPIRATION:

~

 Today, I want to show you our napkin rings. I used white cloth napkins for the party. I cut a short length of embroidery floss in coordinating colors, threaded it through the button holes and tied a knot making sure the napkin was snug in the loop of thread. It didn't take very long at all to make and the result was so cute. 


~ ~ ~


Tuesday, October 15, 2013

{31 Days of Pinterest Completed} Button Candle Embellishment

PIN INSPIRATION:

~

I saw this pin idea last winter and right away I knew I wanted to make one to put in my room. I got out my jewelry wire, my jar of buttons, and a big vanilla jar candle. I chose buttons of all sizes, shapes, and colors for my ring. It wasn't the easiest project since it was hard to judge how far apart to put the buttons so that at the end there wasn't a big gap or  not enough space and also figuring out how to finish off the wire so that it didn't come apart. I wrapped the wire through the button holes a time or two that they were more secure but this isn't necessary. The last button, I looped the wire around a few more times than the others and  made sure both ends were in the back side of the button. Then I threaded a jewelry crimp through both ends of the wire and squeezed it tight. Once the extra wire was snipped you could hardly see a difference. 

For the button baby shower, I made button rings for mini votive candles that were decorations and also party favors. After doing a dozen of these babies, I got the hang of it and the process was much quicker.


~ ~ ~


I'm also linking up to Schneider Peeps' Handmade Christmas.